Nautilis DuoSens – Smart Wireless Pressure & Temperature Monitoring
Nautilis DuoSens is an advanced device designed for monitoring pressure and temperature. It collects data from a pressure sensor, displays it on the built-in screen, and wirelessly transmits it to various applications via a WiFi network. Depending on the selected application, users can track readings on computers and mobile devices and receive notifications in case of alarm values.
Supported Applications:
✔ BrewSpy, SensorSpy – Data sent every 5 minutes
✔ Brewfather – Data sent every 15 minutes
✔ MQTT, Home Assistant – Fast updates every 10 seconds
✔ Blynk IoT, Blynk Legacy, HTTP – Flexible integration
Smart Notifications:
- In case of alarm values, applications allow notifications on mobile devices.
- The Blynk application includes pre-configured alarm settings for pressure and temperature, which can be adjusted directly from the device interface.
Precision & Flexibility
- The device supports pressure units in Bar or PSI, and temperature units in °C or °F.
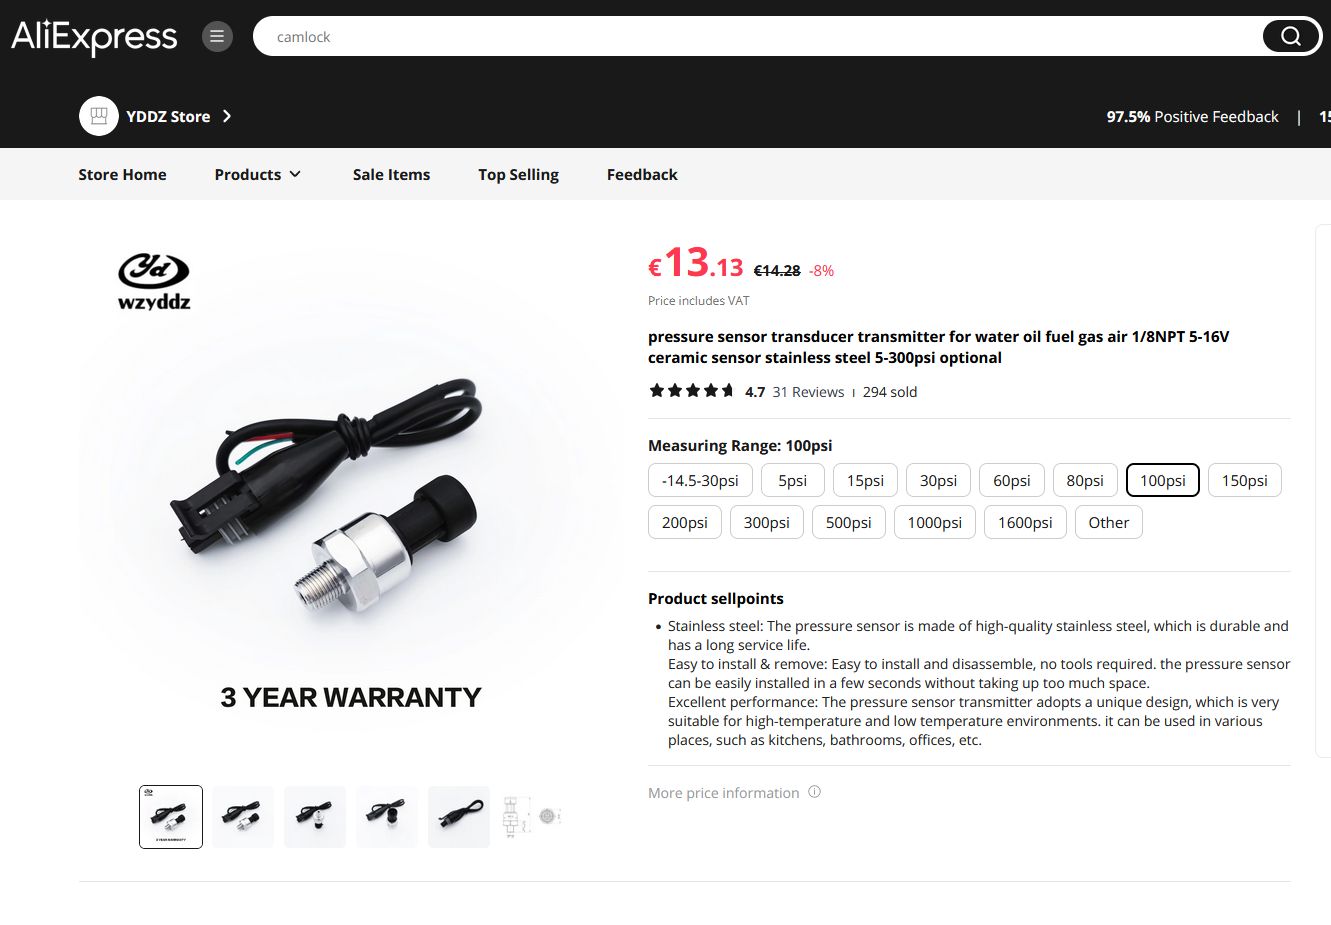
- The pressure sensor is ordered separately, and the recommended model has an output of 0.5-4.5V with a range of up to 100 PSI.
- The sensor connection is simple, and the cable length can be extended as needed.
- If needed, two temperature sensors can be added for extended monitoring.
Built-in Display & LED Backlight
The device features a blue LED backlight, which can be turned off in the settings. The display provides clear and detailed real-time information, including:
- Temperature readings from Sensor 1 and Sensor 2
- Alarm thresholds for low and high temperature
- Alarm thresholds for low and high pressure
- WiFi signal strength
- Device name
- Current pressure displayed in Bar or PSI
- Temperature trend indicator – A blue arrow appears if the temperature is decreasing, and a red arrow appears if the temperature is increasing
Technical Specifications
- Power Supply: 5V via USB-C (charger not included)
- WiFi: 2.4 GHz network (does not support 5 GHz)
- Display: Built-in screen for real-time readings with adjustable LED backlight
Nautilis DuoSens is the perfect solution for home brewers, technicians, and anyone needing accurate and reliable real-time pressure and temperature monitoring.


Nautilis management system
View and edit DuoSens settings (no internet required)
To view and change the device settings, first connect to the WiFi network that the device transmits, which is usually: Nautilis_sensors. The network password comes on the paper with the device. After connecting to the network, some devices automatically open the Internet browser, and some require you to open the Internet browser and go to the address: 192.168.4.1
After that, the Nautilis thermometer managment home page opens where you can view and edit the following settings:
WiFi Config
SET UP ONLINE SERVICES
SensorSpy
 In SensorSpy app or web site you can view graphs and stats, keep a record of your data history, receive alert notifications and more. SensorSpy gathers the data that your Nautilis DuoSens collects and lets you access them using an Android app or though the web app version.
You must enter your WiFi network data in the Network name and password fields. Watch out for uppercase and lowercase letters!
The SensorSpy service must be marked and stored on the thermometer. Then a new field appears in the relay settings: Custom Stream URI in which you need to paste the SensorSpy token from the SensorSpy setup menu.
You can select the temperature sending interval of 5, 15 or 60 minutes.
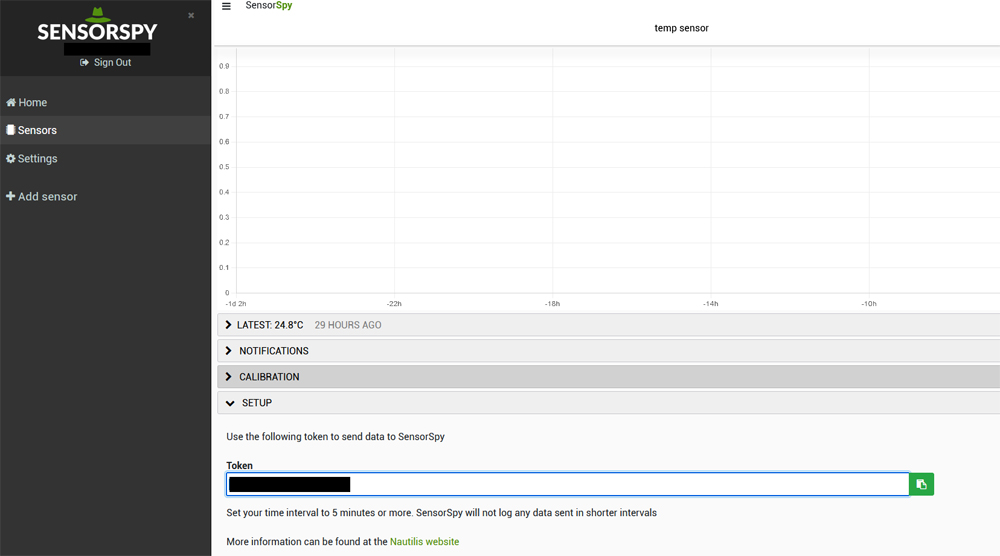
Click the SUBMIT button and reboot the device.
BrewSpy
 BrewSpy on your homebrews as they ferment, view graphs and stats, keep a record of your brewing history, receive alert notifications and more. BrewSpy gathers the data that your Nautilis DuoSens collects and lets you access them using an Android app or though the web app version.
You must enter your WiFi network data in the Network name and password fields. Watch out for uppercase and lowercase letters!
The BrewSpy service must be marked and stored on the thermometer. Then a new field appears in the relay settings: Custom Stream URI in which you need to paste the BrewSpy token from the BrewSpy setup menu.
You can select the temperature sending interval of 5, 15 or 60 minutes.
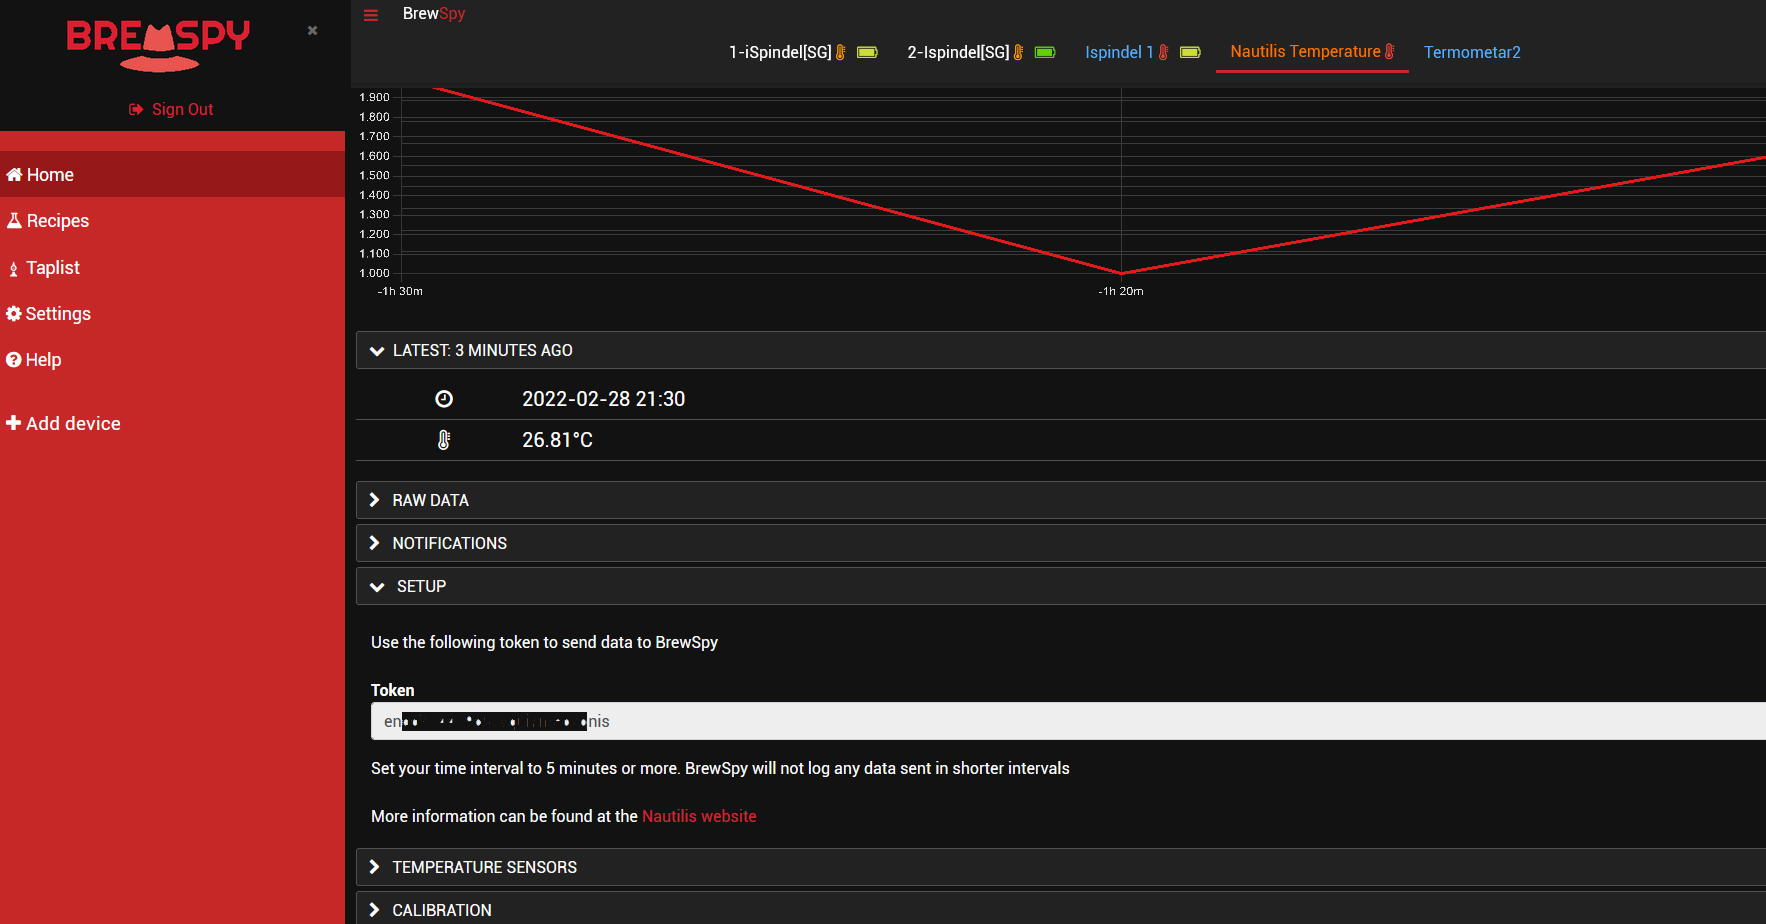
Click the SUBMIT button and reboot the device.
Brewfather
![]() Brewfather is a brewing software made from the ground up to give you the best recipe design and brewing experience on both desktop and mobile devices. With a modern design that is easy to use. Get your recipes done in no time! With automatic synchronization between all your devices and offline support.
Brewfather is a brewing software made from the ground up to give you the best recipe design and brewing experience on both desktop and mobile devices. With a modern design that is easy to use. Get your recipes done in no time! With automatic synchronization between all your devices and offline support.
Available as a web app and download on Google Play or the App Store. Brewfather can be used on any device. Add it to your home screen or desktop without having to install anything: Simply open it in the browser and add it to your home screen, or download the app version.
You must enter your WiFi network data in the Network name and password fields. Watch out for uppercase and lowercase letters!
The Brewfather service must be marked and stored on the DuoSen. Then a new field appears in the relay settings: Custom Stream URI in which you need to paste the Brewfather URL for the Custom stream.
Custom stream URI should look like example: /stream?id=123456789
The temperature sending interval must not be less than 15 minutes.
Click the SUBMIT button and reboot the device.
MQTT
 You must enter your WiFi network data in the Network name and password fields. Watch out for uppercase and lowercase letters!
The Mqtt service must be marked and stored on the thermometer. Then a new field appears in the settings: MQTT server: Here you enter the link or IP address of the server. User & password: Here you enter the username and password if it is set on the server.
You can select the temperature sending interval of 10s, 60s, 5,15 or 60 minutes.
Click the SUBMIT button and reboot the device.
To view the data on the client, it is necessary to enter the topic: ap_ssid_of device/pressure
Since each device must have a different ap ssid, that is precisely the difference in the topic. Therefore, multiple identical devices can be used to send to MQTT
The port is hardcoded to 1883
HOME ASSISTANT
 Connecting a device to MQTT and integrating it with Home Assistant involves establishing communication between the device and the MQTT broker, and then configuring Home Assistant to automatically recognize and interact with the device. Here’s a simplified description without delving into the YAML configuration file:
HTTP
 HTTP (Hypertext Transfer Protocol) is a protocol that enables the exchange of data over a network. With the Nautilis termometer or Nautilis DuoSens you can send data using the HTTP protocol to other devices or servers that can process and display the data or use it for another purpose. HTTP allows for fast and easy data exchange and is one of the most commonly used protocols for data exchange on the internet.
You must enter your WiFi network data in the Network name and password fields. Watch out for uppercase and lowercase letters!
The HTTP service must be marked and stored on the thermometer. Then a new field appears in the settings: Server Address: Here you enter the link or IP address of the server. Custom Stream URI or token: Here you enter the custom stream/URI/PATH of the server.
You can select the temperature sending interval of 1, 5,15 or 60 minutes.
Click the SUBMIT button and reboot the device.
BLYNK IOT & BLYNK LEGACY
![]() Personal support is provided for setting up the Blynk application.
Personal support is provided for setting up the Blynk application.
The device supports the old version if you have BLYNK installed on a private server. If you don’t have it, the application also has support for the new Blynk application.
Management
Here you change the alarm and sensor settings.
Audio alarm
Here you can turn the thermometer audible alarm on or off.
Reset settings
Reboot
Opening this link will reboot the device


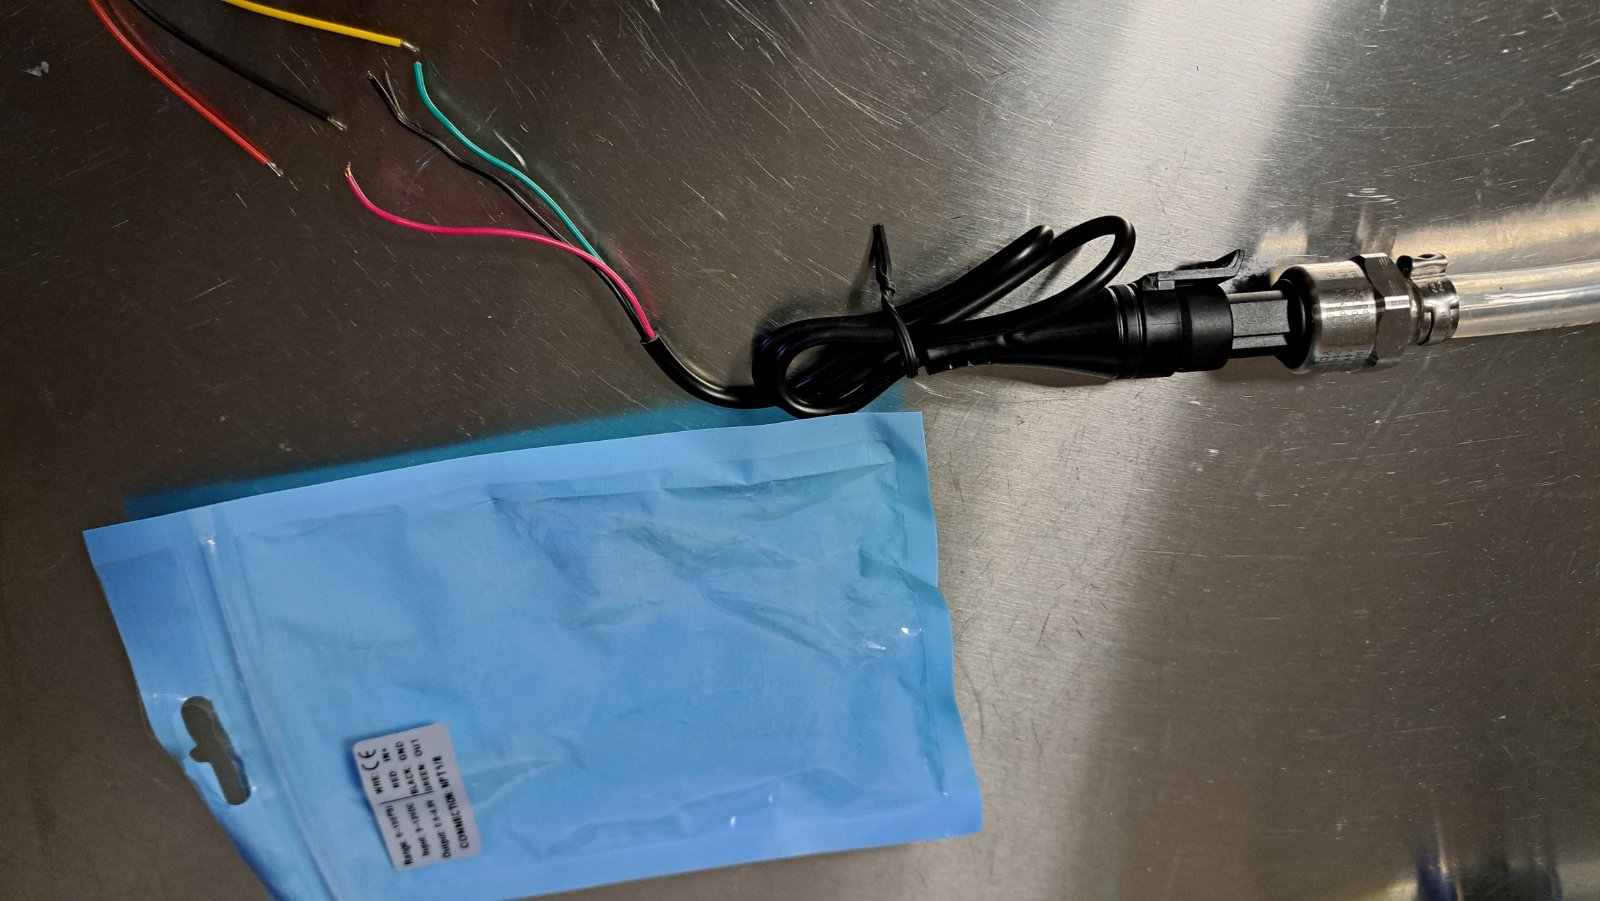
How to connect wires and pipes to a pressure sensor
With iPressure or iRelay supporting the pressure sensor, you will receive all the preparation in the device with wires that connect to the internal connector. You only need to connect 3 wires from the pressure sensor to them. The pressure sensor has wires in 3 colors: Black, Red, and most commonly Green. Connect the black sensor wire to the black device wire, the red sensor wire to the red device wire, and the green sensor wire to the yellow device wire. If you want to extend the sensor wire, you can also do so with any thin wire without affecting measurement accuracy. Finally, protect the wire with heat shrink tubing.
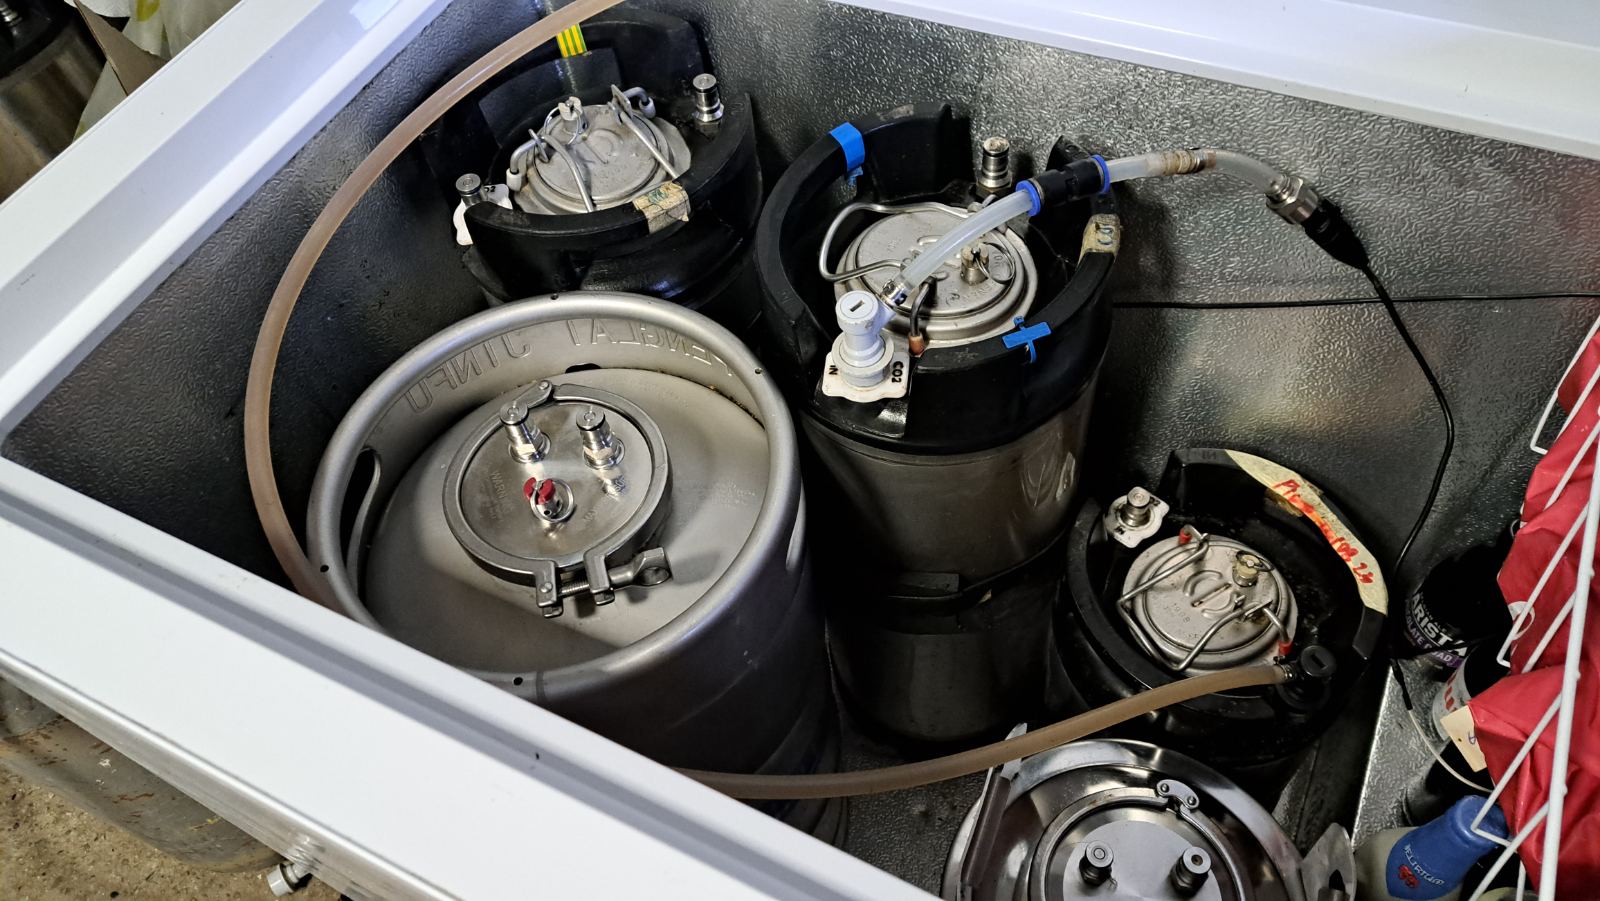
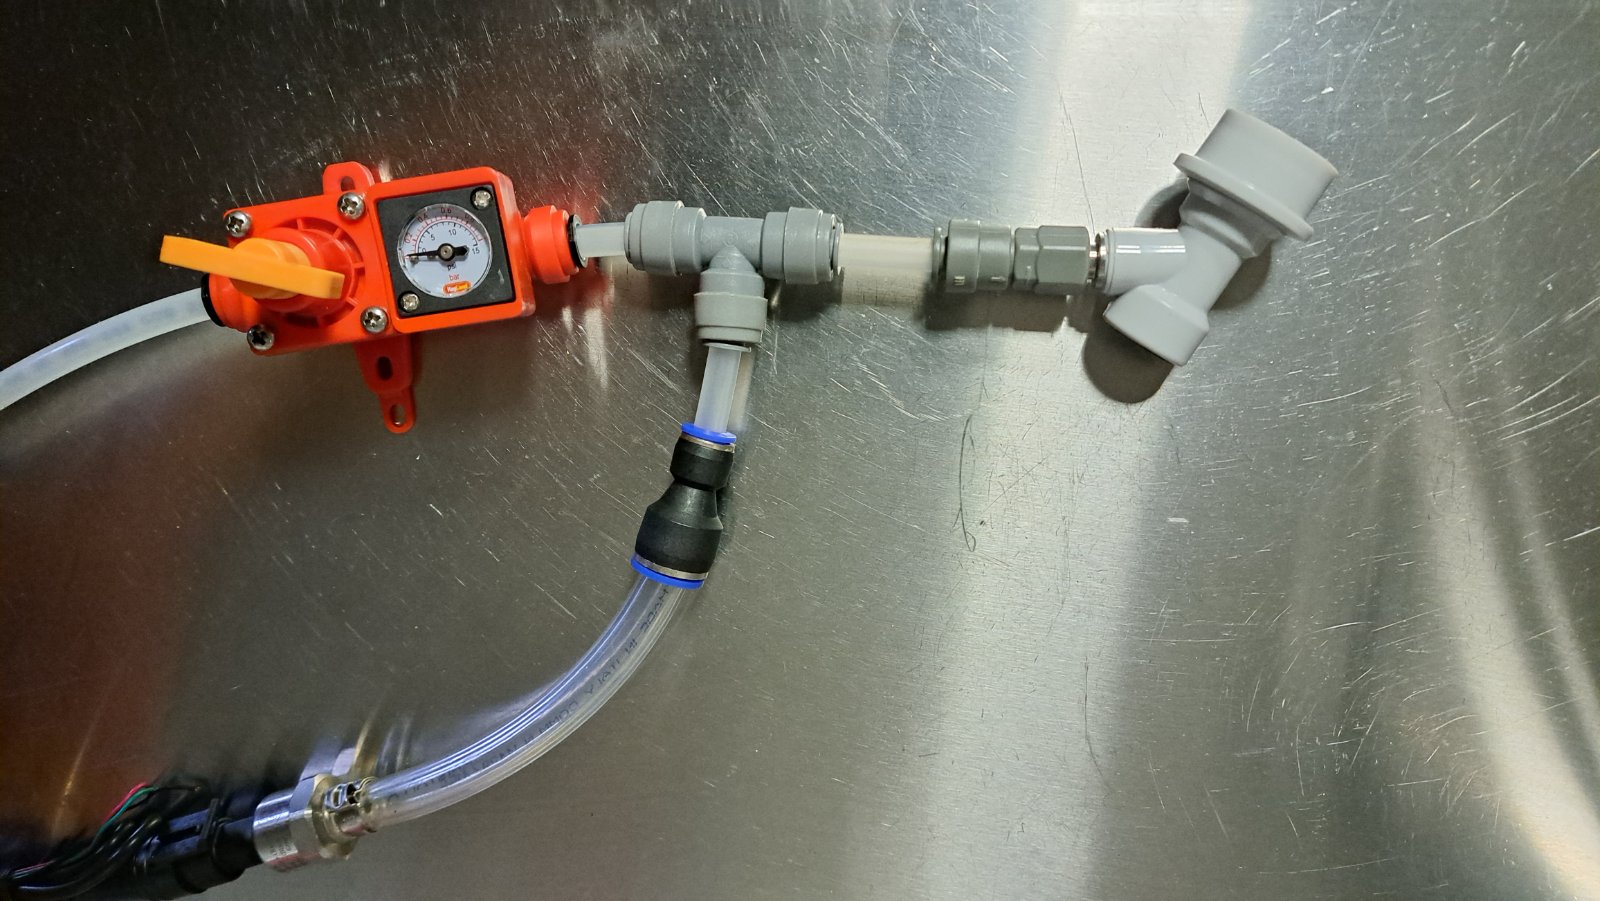
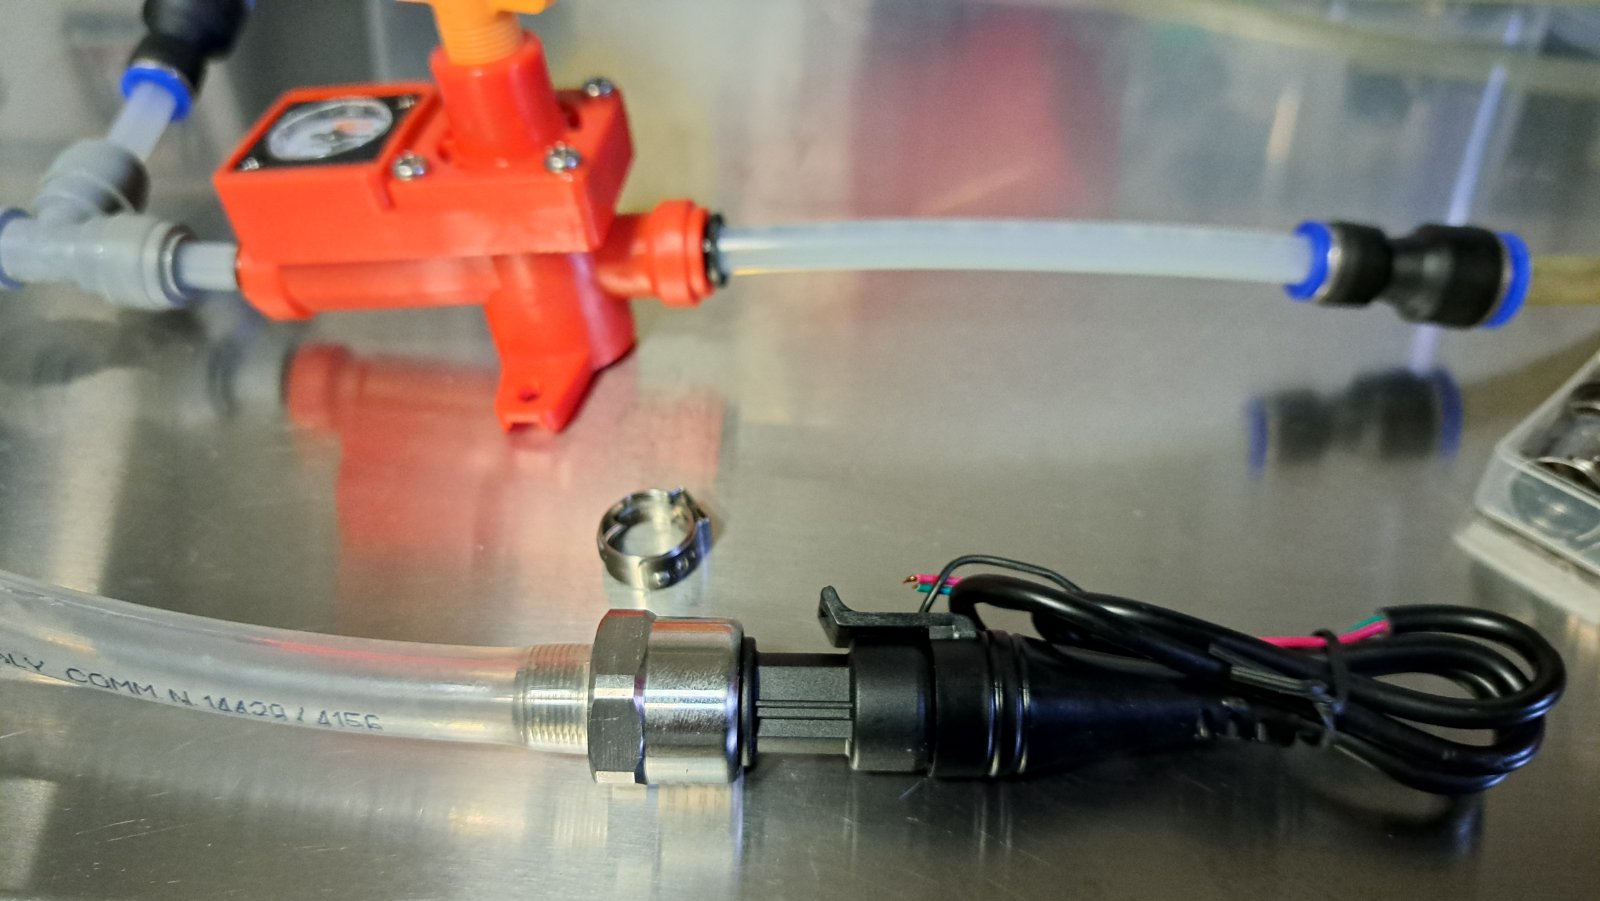
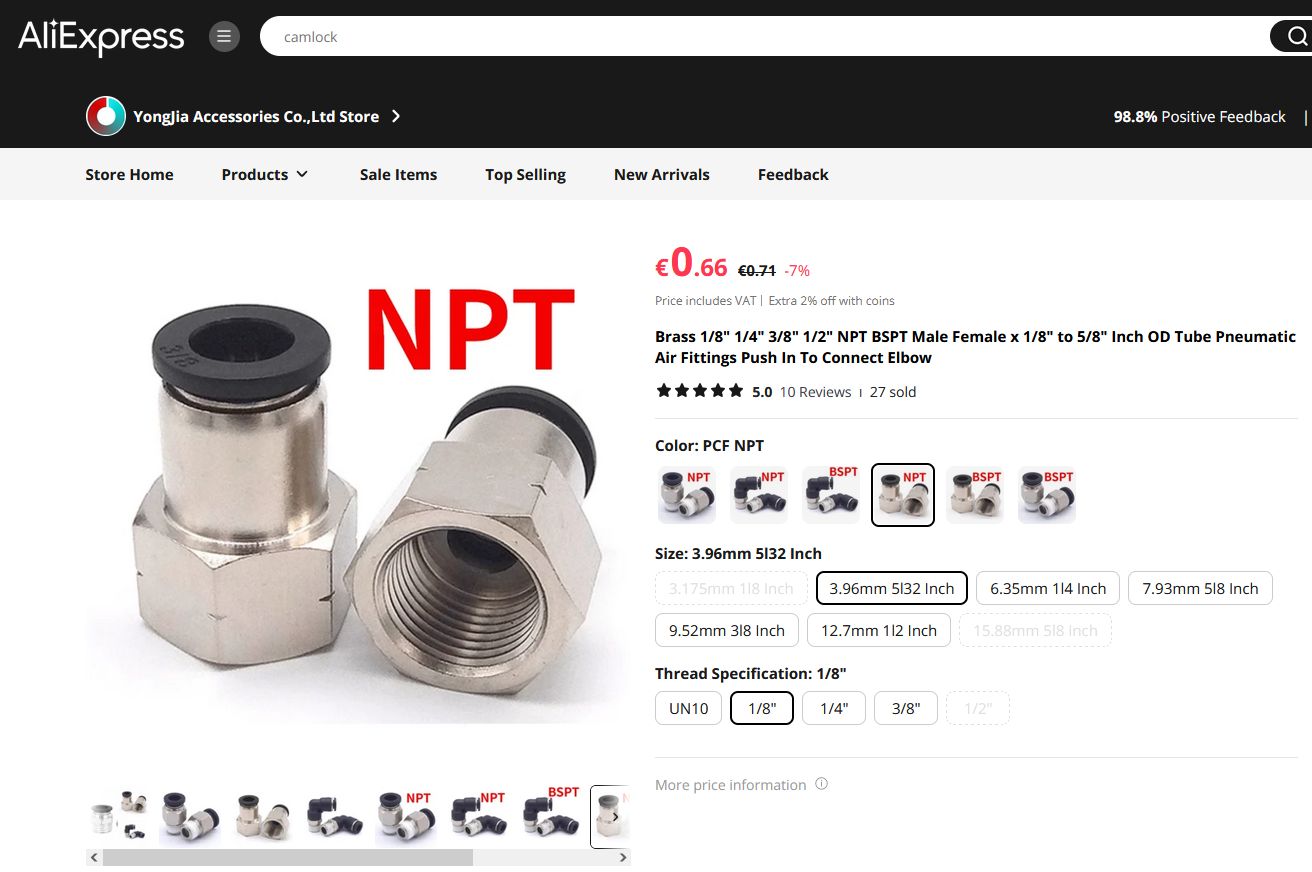
To connect pipes to the pressure sensor, you have several options: The simplest method is to purchase a Brass 1/8″ NPT Female to 5/8″ Inch OD Tube Pneumatic Air Fitting. Then, you only need an 8mm tube that connects to the Kegland Spunding Valve. If you don’t have the fitting, there is also a DIY method you can use. You can thread a 12mm tube onto the sensor and secure it with a hose clamp. Then, attach a reducer to the 12mm tube to match the size of the tube you are using.